previous next

How to Pit Cherries

posted in Fruits by Kathy Maister

My all-time, number-one, favorite fruit is the cherry! Cherries are in season from about late May until early August. “Bing” cherries are the most popular kind on the market. When you buy them, be sure that they are firm, a deep, dark red in color, and still have the stem attached.

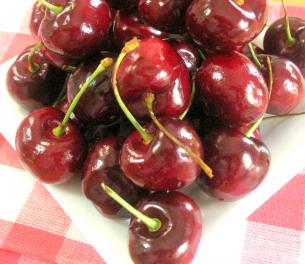
Ranier cherries are yellow/pink-ish in color and are sweet and juicy, but don’t have quite the intense flavor of the Bing Cherries

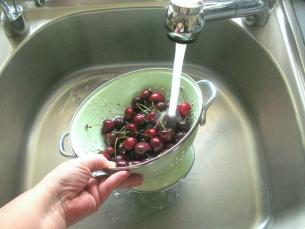
Don’t wash cherries until you are ready to eat them. They should be stored in the refrigerator in a plastic bag. Cherries will keep for about a week in the refrigerator, but it’s better to buy small amounts and eat them within a day or two of purchase.

The best way to serve cherries is simple: rinse them in cool water, put them on a serving dish and dig in!

If you are adding them to a fruit salad, or putting them on top of cereal or ice cream you are going to want to remove the pit. Using a small paring knife cut around the cherry and split it in half. Pick out the pit with your fingers.

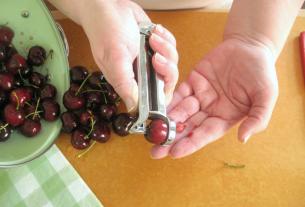
There is another way. I am not someone who likes to buy gadgets that are for doing just one thing. Storage space in just about everyone’s kitchen is very valuable, so why waste it on something that can’t perform multiple tasks? However, my cherry pitter breaks that rule!

The pitter, the strange-looking gadget pictured above next to the knife, supposedly can remove the pit from olives as well, but I have never been able to make it work with olives.

But it can remove the pit of a cherry in seconds!

Wash and remove the stem off the cherry. Place the cherry on the curved bit under the spike.

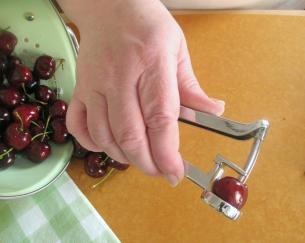
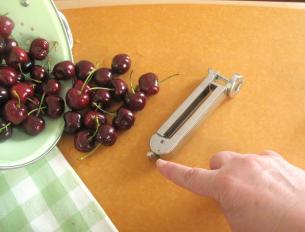
Squeeze the pitter so that the spike goes through the cherry, forcing out the pit.

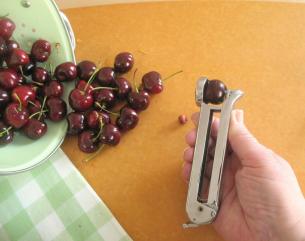
Just that easy, just that quick!

There are a few things you need to be careful of, however.

If your cherries are really plump and juicy the spike may go around the pit instead of popping it out. Make double sure the pit actually did pop out!

Really juicy cherries sometimes get a bit messy, with juice squirting back at you. Be careful your shirt doesn’t get covered with cherry stains.

When you are through pitting all your cherries, rinse off the pitter and dry it with a dish towel.

There is a little lever on the base of the cherry pitter which will hold it closed and therefore take up less room in your kitchen drawer.

At the cost of about $12, these cherry pitters are not inexpensive, but if you love cherries, I think it’s a great investment. Cheers!

If you are new to startcooking, or are a regular visitor here, please consider subscribing for free.

12 Comments

Becky Glenney said:

The description of how to pit cherries is terrific1
I am curious where you are located?
We have a fruit education centre in Niagara Ontario at the gateway to the Niagara fruit growing region but here the cherry season is limited to the first three weeks of July.
Have a great day,
Becky

Kathy Maister said:

Hi Becky, last week my grocery store, here in Boston was selling imported cherries for only $4 per pound! I was amazed at how good they were and how reasonably priced as well!

Judith S. Rogers said:

This is how I pit cherries without a pitter. Use a plastic drink straw from a local fast food outlet. I keep several new ones in my kitchen drawer. After washing the fruit, center a 2″ section of straw over the stem and twist and push until the end of the straw hits the pit.. Now turn the fruit over and push the straw through the blossom end. This time, keep pushing and twisting, and the pit loosens and can be pushed out the stem end along with the stem. After practice, this method is almost as fast as using a pitter, and the used straw section can just be discarded. This method also works for strawberries. To remove the core, simply push and twist the section of straw through the bottom end of the strawberry, being careful to aim at the center of the top end. Usually the core will come right out, and you can pull it out of the straw by the attached leaves. This works well when you need a whole strawberry for your recipe. I expect you could pit olives using this method, too, although I haven’t tried it.

Kathy Maister said:

WOW! Judith that sounds amazing! Free plastic straws are a lot more economical than buying a cherry pitter. (Oh but I do love my cherry pitter!)

desertrose said:

After several attempts,I used the straw method with a bamboo skewer inserted rounded side first to reinforce the straw,blossom end first through the stem end and it worked like a charm

Kathy Maister said:

I tried the straw trick and could not make it work. The straw kept collapsing! The bamboo skewer sounds like the perfect solution. I’ll give that a try!

Joan Rogers said:

Judith ,
I tried the straw the only thing is that I didn’t cut the
straw. Also when I was pushing the straw threw the cherry I didn’t have to turn the cherry around for the pit to fall out it just popped out.
Thanks for the great hint.
Joan

Joshua Elek said:

I don’t have a cherry pitter, but when I saw how it works, I tried to improvise, and it worked great! I have a spoon with a hole in the handle that is used to hang the spoon on a hook. I rested the cherry in that hole, and used a chop stick to force the pit out of the cherry. It worked perfectly every time!!! So, if you don’t have a pitter, this might work for you.

startcooking said:

Great tip Joshua!
Do you think pitt-less cherries will ever be available? We certainly have the option to buy seedless grapes???

Molly said:

One other item you might have on hand to use as a pitter: a star shaped cake decorating tip. These cone shaped extrusion tips fit into the end of a cone shaped pastry bag to despense frosting or other foods. Use one to crown the end of your index finger. The rather sharp and sturdy star shaped opening at its tip is just about the size of a cherry pit and will push it through to the back side of the fruit.

I am waiting for cherry season here with an eye on this slab pie recipe.

Can’t Wait!

startcooking said:

Great idea Molly! I will have to give it a try.

I found that trying to remove cherry pits with a straw was really frustrating and did not work for me!

Abby Ingraham said:

Here’s another easy way to pit cherries which only requires a knife. Cut the cherry vertically all the way around. then just twist one half with your fingers, which will pop right off. Then just use your thumb nail in one swift little flick motion to flick out the pit. Voila! all done. I also use this technique with avocados and other firm stone fruit, but with avocados I take the blade of the knive and give the pit one good whack so that the blade sinks into the pit. Then twist slightly and it will just lift out. (This pit removal technique will only work with avocados, though as other stones aren’t soft like the avocado’s.)

More content