


If you’ve ever enjoyed a hearty, tender beef stew or the melt-in-your mouth texture of lamb shanks, you’ve enjoyed the product of a process called braising. This method of sloooooowwwwly cooking meat, vegetables or other ingredients over a low temperature turns out delicious results with relatively little effort. So, it’s a great technique for beginners to try.
It does take a little bit of planning ahead, though. If you want to try braising, keep in mind that you’ll have to get that pot on the stove (or in the oven) early in the day. Perhaps you can get the ingredients prepared in the morning and then cook them in the early afternoon so that the dish is ready for dinner. (Word of warning: do not leave your house with food cooking on the stove top or in the oven!)
Why Beginners Should Try Braising:
- It’s low-maintenance cooking! Once the ingredients are in the pot, you just let them cook slowly while you do something else.
- You typically end up with a one-pot meal that’s got a delicious stewy/saucy texture. Eat it with some crusty bread and forget about preparing other side dishes!
- Slow cooking transforms the texture of cheaper cuts of meat, giving them a tender, fall-off-the-bone quality.
- Braising typically makes a large amount, so there are leftovers for lunch the next day or to store in the freezer.
How to Braise
- The process starts with searing or browning meat (or other main ingredients) on the stove, then simmering the ingredients in a liquid over low heat.
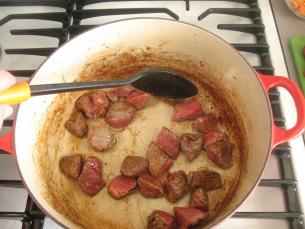
Kathy demonstrates how to brown the meat for Guinness Stout Beef Stew.
- The searing/browning step adds flavor to the meat, while simmering in a covered pot for a long period of time helps make it tender, and often produces a sauce or gravy.

Adding liquid helps to deglaze the pot, and give flavor to the stew.
- The liquid used in the braising process depends on the recipe or personal choice; it can be anything from water, to stock, to wine or beer.
- When the liquid is poured into the pot or pan where the ingredients were browned, it deglazes the pan. In other words, the flavorful juices and fat stuck on the sides of the pot get incorporated into the cooking liquid.
- The simmering process can happen on the stove-top or in the oven, depending on what the recipe calls for. But, if you’re following a recipe that says to use the oven, the pot you’re using must be oven-safe. Check the bottom of the pot or the manufacturer’s instructions – don’t take any chances.
What to Braise in:
The recipe you’re using will dictate what kind of pot or cooking vessel to use, but here’s a rundown of some of the terms you may come across.
- A Dutch oven, which is usually a heavy pot with a tight-fitting lid that’s made of cast iron or enamel-coated iron.
- A Crock Pot (also known as a slow cooker). This is an electric appliance that cooks food at a constant temperature for a set period of time. Crock Pots can be set to cook food while you’re out of the kitchen or even out of the house. If you’re planning on using a Crock Pot, use a recipe that’s designed to be cooked that way. (There are many die-hard Crock Pot fans out there including Stephanie O’Dea, who made a New Year’s resolution to use her Crock Pot every day in 2008. She blogs about her project at A Year of Crockpotting.)
- A pressure cooker
- A large saucepan that has a lid
Great Recipes for Braising
Start by trying Corned Beef Brisket—it doesn’t get easier than this!
Startcooking.com offers some recipes that serve as a great introduction to braising. Corned Beef Brisket (shown above) is a good starting point because, although the process involved isn’t technically braising, it demonstrates the benefits of slow cooking. The meat is not browned—all you do is put it in a pot, cover it with water, bring it to a boil, then simmer for 3 to 5 hours. You’ll end up with moist meat that tastes great as a main course or a sandwich filling.
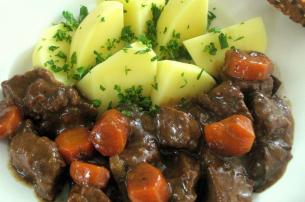
Guinness Stout Beef Stew is braised for a relatively short period of time, about 90 minutes.
The photo tutorial on Guinness Stout Beef Stew (shown above), illustrates every step of the braising process. This stew is also relatively fast, since it cooks for about 11/2 hours.
If you’ve got more time, and prefer a Guinness-less stew, watch Kathy’s video on Beef Stew, which takes around three hours to make.
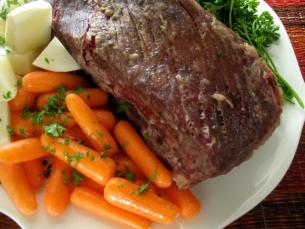
Here’s a helpful guide to a cool-weather favourite: Pot Roast. This photo tutorial over at Greg Cooks shows how you transform a slab of roast into a delicious meal. It gets its flavor from wine, garlic and fresh herbs.
Farmgirl Fare offers a tutorial on slow-cooking lamb; it cooks for two to three hours, but the pictures indicate that it’s well worth the wait.
You may be familiar with the French classic Coq au Vin, which is chicken braised in red wine. In this recipe, the chicken doesn’t cook for that long (around half an hour), but you make a sauce at the end.
For those who own a Crock Pot, here’s a Stewed Chicken Curry recipe, explained in a step-by-step photo tutuorial.
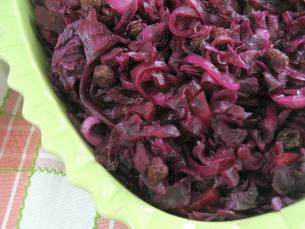
Kathy’s Sweet and Sour Cabbage combines cabbage, apples and raisins for a delicious side dish.
Braising doesn’t have to involve meat. Kathy’s Sweet and Sour Cabbage (shown above) demonstrates how slow cooking can be used to make vegetable-based side dishes.
My Vegetable Blog offers Sherry-braised Onions and Apples with Raisins, a dead-easy way to make a dish of soft onions that works well with cheese and baguette.
If you are new to startcooking, or are a regular visitor here, please consider subscribing for free.


KGWagner said:
Braising is an excellent process, and it’s so easy. I especially like to use it for country-style pork ribs. You can bake, barbecue, slow-cook, or pressure cook those things, but nothing works as well as braising.