How to Cut and Peel an Avocado: A Basic Guide

posted in Fruits by Kathy Maister

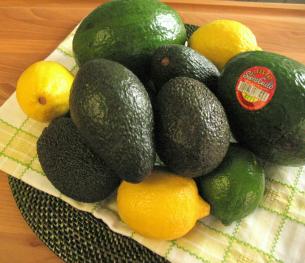
Avocados are a fruit, (yes a fruit) that contains (unsaturated) fat. That’s what gives them that wonderfully rich, buttery taste. There are a lot of varieties of avocado but the two that are most readily available here in Boston are the Hass and the Fuerte.

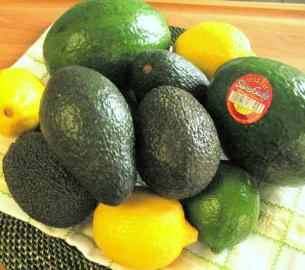
The Fuerte avocado has a smooth thin green skin while the Hass is darker, almost black, with a pebbly textured skin. Many people prefer to use the darker (Hass) ones because they have a richer more pronounced flavor. (Unfortunately, they also have a few more calories than the Fuerte avocado.)

When using avocados, planning ahead is essential. For example, if you try to make guacamole with a hard, under-ripe avocado, neither the texture nor the taste will be very pleasant.

Buy avocados that yield to gentle pressure but are not soft or mushy. Unfortunately, this kind of avocado is difficult to find in many grocery stores since avocados, like bananas, continue to ripen even when they have been taken off the tree. Your supermarket will often buy fresh-picked avocados, so you usually don’t have any choice but to buy a really hard avocado.

Fortunately, you can hasten the ripening process by placing the hard avocados in a brown paper bag for 2-4 days. As with bananas, you can speed up the ripening process by sticking an apple (preferably a green Granny Smith apple) in the bag as well. (It’s the ethylene from the apple that does the trick!)

How to Cut and Peel an Avocado

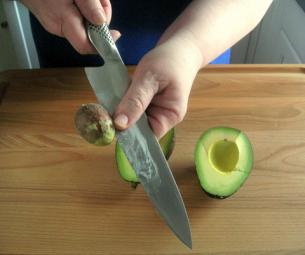
Begin by cutting two avocados lengthwise rather than making the cut around the width.

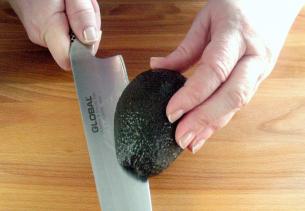
(It will be virtually impossible to remove the pit if you slice it in half around the fat part.)

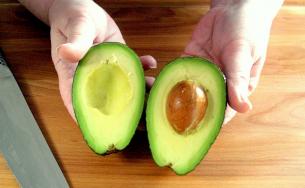
Separate the two pieces. Leave the avocado on the cutting board and (CAREFULLY!) give the pit a thwack with a big sharp knife.

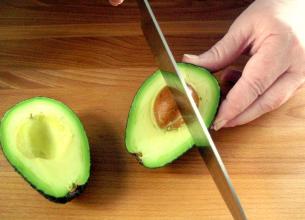
Twist the knife and the pit should pop out.

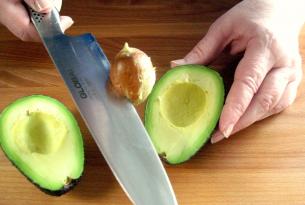
If you now put the back of the knife against your palm, you should be able to pinch the pit off of the knife with your thumb and fore finger, with no danger of getting cut. (I’m right handed so I would continue to hold the knife in my right hand and put the back of the knife in my left palm to remove the pit from the knife.)

With a spoon…

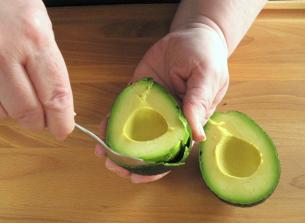
…scoop out the avocado.

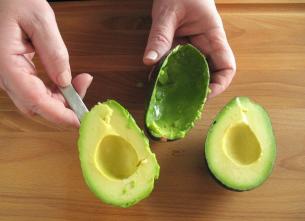
It’s OK to put the skin down the garbage disposer, but I just throw the pit (actually called the stone) in the trash. The stone is about as hard as a golf ball!

It’s important to note that, once exposed to air, avocado discolors very quickly. Adding lime or lemon juice helps to prevent discoloration. It is widely believed that an avocado pit left in guacamole will help to maintain the lush green color. Wrong. Stick with the lemon or lime juice.

Avocados are almost always eaten raw. If your recipe calls for adding the avocado to something hot, do it at the very last minute, just before serving. They actually turn bitter when they are cooked…Who knew?

If you are new to startcooking, or are a regular visitor here, please consider subscribing for free.

How to Pit Cherries

posted in Fruits by Kathy Maister

My all-time, number-one, favorite fruit is the cherry! Cherries are in season from about late May until early August. “Bing” cherries are the most popular kind on the market. When you buy them, be sure that they are firm, a deep, dark red in color, and still have the stem attached.

Ranier cherries are yellow/pink-ish in color and are sweet and juicy, but don’t have quite the intense flavor of the Bing Cherries

Don’t wash cherries until you are ready to eat them. They should be stored in the refrigerator in a plastic bag. Cherries will keep for about a week in the refrigerator, but it’s better to buy small amounts and eat them within a day or two of purchase.

The best way to serve cherries is simple: rinse them in cool water, put them on a serving dish and dig in!

If you are adding them to a fruit salad, or putting them on top of cereal or ice cream you are going to want to remove the pit. Using a small paring knife cut around the cherry and split it in half. Pick out the pit with your fingers.

There is another way. I am not someone who likes to buy gadgets that are for doing just one thing. Storage space in just about everyone’s kitchen is very valuable, so why waste it on something that can’t perform multiple tasks? However, my cherry pitter breaks that rule!

The pitter, the strange-looking gadget pictured above next to the knife, supposedly can remove the pit from olives as well, but I have never been able to make it work with olives.

But it can remove the pit of a cherry in seconds!

Wash and remove the stem off the cherry. Place the cherry on the curved bit under the spike.

Squeeze the pitter so that the spike goes through the cherry, forcing out the pit.

Just that easy, just that quick!

There are a few things you need to be careful of, however.

If your cherries are really plump and juicy the spike may go around the pit instead of popping it out. Make double sure the pit actually did pop out!

Really juicy cherries sometimes get a bit messy, with juice squirting back at you. Be careful your shirt doesn’t get covered with cherry stains.

When you are through pitting all your cherries, rinse off the pitter and dry it with a dish towel.

There is a little lever on the base of the cherry pitter which will hold it closed and therefore take up less room in your kitchen drawer.

At the cost of about $12, these cherry pitters are not inexpensive, but if you love cherries, I think it’s a great investment. Cheers!

If you are new to startcooking, or are a regular visitor here, please consider subscribing for free.

How to Cut a Mango

posted in Fruits by Kathy Maister

A mango is one of those fruits that people avoid buying because they don’t know how to cut them. I’ll show you two different ways to cut a mango.

Mangos are great with just about anything. (Chicken, fish, salsa, pancakes, smoothies, on ice cream, fruit salad, etc.) They are low in calories, can be eaten fresh or cooked and are really tasty.

They are in season from May to September. When you buy a mango, it should have a fragrant, fruity aroma and yield slightly to pressure from your thumb. It will ripen sitting on your counter, or you can speed the ripening process by sticking it in a paper bag. Once ripe, put it in the refrigerator. A mango should get eaten within a day or two of being cut.

To cut a mango, start with a serrated edge knife. (That’s the one with the jagged edge that you use to cut a loaf of bread.)  Mangos are very slippery and you have to be very careful when peeling a mango that the knife does not slip.

Slice off the fattest part, sometimes called the “cheek”, of both sides of the mango. Notice in the photo below the position of the knife in relationship to the stem. (The stem is next to my left index finger.)

Now score the “cheek”. That means to make shallow cuts with a paring knife. Make each cut about ½ inch apart, and then turn the “cheek” and make perpendicular cuts as well.

Once scored, press the back side of the mango so that all the flesh is standing at attention. You can serve it this way or trim off the flesh from the skin.

Cut around the pit with a small paring knife.

Remove the remaining skin from the flesh.

Trim around the pit to remove the remaining flesh.

The pit is actually quite large as you can see from the photo below.

The Alton Brown Way to Peel and Cut a Mango:

I was watching Alton Brown on FoodTV demonstrating how to peel and cut a mango. His method actually produced more edible flesh, and was safe and efficient.  But you do need a few more pieces of equipment for the Alton Brown method.

Corn-on-the-Cob Holders

In addition to a large kitchen knife, you will need a vegetable peeler and a corn-on-the-cob holder.

Start by peeling the mango with a vegetable peeler

Then slice off the top (stem end) and bottom of the mango.

Insert a corn holder into the mango.  This is going to act as a holder while you slice the mango. Notice how the mango can stand by itself!

Holding the corn holder, slice off the cheeks.

And trim the flesh off the pit.

Then slice the mango according to your recipe.

Enjoy!

If you are new to startcooking, or are a regular visitor here, please consider subscribing for free.