How to Roast Chestnuts

posted in Appetizers and Snacks, Pantry by Kathy Maister

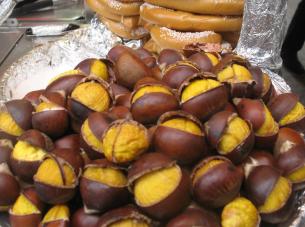
On a recent visit to New York City, the weather was cold and crisp. On such days, my husband (David) and I always share a small brown bag full of freshly roasted chestnuts from one of the street vendors who seem to be on every other NYC street corner. After letting the chestnuts cool down for a few minutes, David always peels these delightful treasures so I don’t have to take my mittens off! They are so rich, sweet and tender!

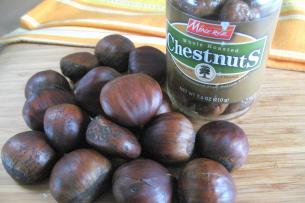
When I saw fresh chestnuts at the grocery store, I thought it would be great to roast some at home for startcooking. For comparison sake, I bought a jar of pre-packaged chestnuts as well.

Before I begin, I would like to point out that Water Chestnuts are from an aquatic plant and are a totally different food than the chestnuts (from a tree) that I am about to roast.

To Roast Chestnuts:

Preheat your oven to 425 degrees F.

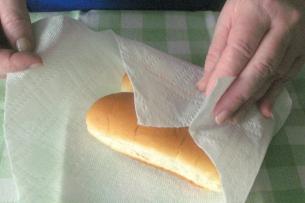
Wipe the chestnuts off with a damp towel and set them on a cutting board, flat side down.

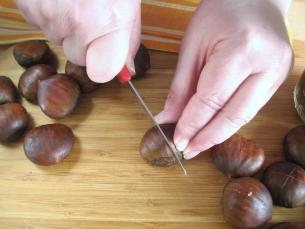
With a small, sharp knife cut an X in each chestnut. (There are special chestnut-X-cutting knives that you can buy – see comments below. I would only recommend buying one of these knives if you roast a TON of chestnuts.) The X allows the steam to escape while they are cooking. (Do not omit this step, otherwise the chestnuts could explode in the oven!) This will also make peeling a lot easier.

For safety sake, you may feel more comfortable cushioning the chestnut on a (clean) dish towel to cut the X.

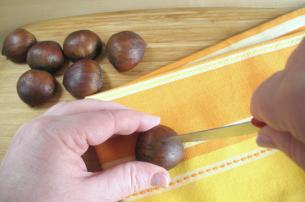
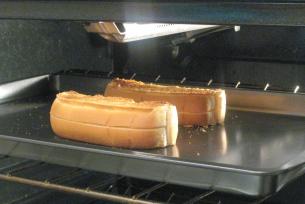
Put the chestnuts in a baking pan with the X facing up.

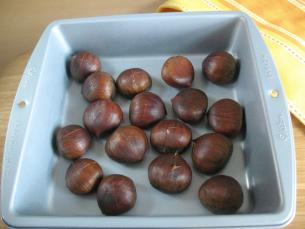
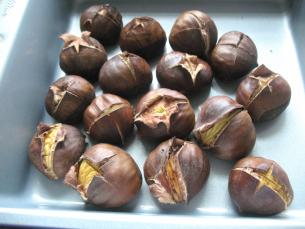
It will take 20-30 minutes to roast the chestnuts. When cooked, the shells will burst open, and the chestnut will be golden brown. The tricky part is actually knowing when they are done. If you over-cook OR under-cook them, they will get hard and the inner skin will be very difficult to remove.

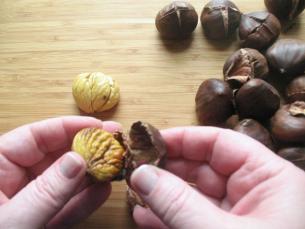
Now comes the hard part: peeling them! You need to peel them while they are still warm. Let them cool just enough so that you can touch them, then start peeling. Be very careful not to burn your fingers!

Be sure to buy extra, because once they are open you may well discover that some have actually turned bad and are not edible.

This task is not as easy as David makes it look. My thumb is killing me!

So now comes the test: comparing the fresh chestnuts to the ones from the jar. There are four things to consider:

  1. Appearance
  2. Taste and Texture
  3. Price
  4. Convenience

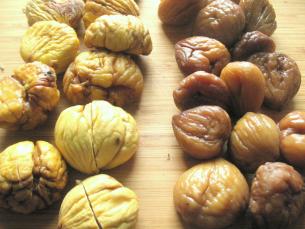
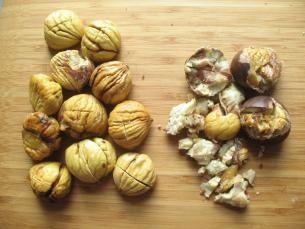
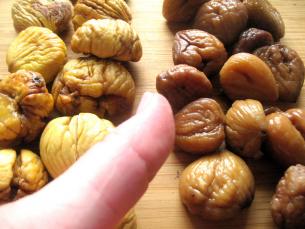
Freshly Roasted (on the left) Vs. From a Jar

1. Appearance
First let me say that the chestnuts I bought from Whole Foods did not end up looking at all like the magnificent ones from the street vendor. (Of course the 7 or 8 chestnuts from the street vendor that actually end up in your brown bag don’t look like the ones they have on display either!)

The ones from the jar have a preserved look about them.

2. Taste and Texture
They both tasted delicious but the ones from the jar actually had a moister texture.

3. Price
The 17 fresh chestnuts from Whole foods cost $4.67

I ended up with 12 usable ones. (Yes there are only 11 in the above photo because I ate one!) Two I could not get peeled, two disintegrated when I tried to peel them and one was rotten.

The 7.4 ounce jar cost $8.99. 100% were usable.

4. Convenience
When I was a kid, whenever my mom would bake, we would always have to shell the walnuts. (Way back then!) It was significantly cheaper to buy unshelled walnuts. It is a very labor intensive activity. Today, having to shell your own nuts sounds like it is on par with having to go milk the cow to get fresh milk! Peeling your own chestnuts is not an easy task!

Conclusion:

All in all, my first preference is to buy them off the street vendor in NYC. ONLY as a special treat, is it worth the effort to roast the chestnuts yourself. The look, the taste and the aroma is wonderful.

BUT, for use in a recipe, I would probably skip roasting them myself and just buy the jar!

Cheers!


If you are new to startcooking, or are a regular visitor here, please consider subscribing for free.

Guacamole

posted in Appetizers and Snacks, Vegetarian by Kathy Maister
Difficulty:
difficulty rating

Guacamole with corn chips is a great addition to any party menu!

The ingredients needed to make guacamole are:

When using avocados, planning ahead is essential. If you try to make guacamole with a hard, under-ripe avocado, both the texture and the taste will be all wrong. When buying avocados, buy the ones that yield to gentle pressure but are not soft or mushy. Fortunately, you can speed up the ripening process by placing hard avocados in a brown paper bag for a couple of days. (That’s why you need to plan ahead!)

Check out my previous posts on how to crush garlic, squeeze juice from a lemon or lime and how to clean and cut jalapeno peppers, because they are what we are gong to tackle first.

Be sure to use fresh limes (or lemons) and fresh garlic and fresh jalapenos for this recipe.

Let’s start cooking!

Crush 2 cloves of garlic.

Squeeze 1/2 of a fresh lime; we will need 2 teaspoons of the juice.

Seed 1 jalapeño pepper and dice it into about 1/8 inch bits. (I always wear disposable gloves when cutting hot chili peppers!)

Cut one tomato in half with the stem end to the right of the knife blade. It is not necessary to peel the tomato.

Squeeze out all the seeds.

Chop the tomato into about ¼ inch bits.

Cut two avocados lengthwise (rather than making the cut around the width.)

http://startcooking.com/public/IMG_5240k.JPG

Separate the two pieces.

Leave the avocado on the cutting board and give the pit a thwack with a big sharp knife.

Give the knife a twist and carefully remove the pit.

Pinch the pit off the knife with your thumb and forefinger and throw it away.

http://startcooking.com/public/IMG_8662.JPG

With a spoon, scoop out the avocado.

It’s OK to put the skin down the garbage disposer, but I just throw the pit in the trash. (It’s sort of like throwing a golf ball in the disposer. You just wouldn’t do it!)

For this chunky guacamole, I like to use a fork to mash it. You could also use a potato masher if you like.

Now add the other prepared ingredients to the avocado. Don’t forget the hot pepper sauce!

With a spoon gently blend everything together.

Give it a taste and see if you need to add some salt and pepper.

It’s important to note that, once exposed to air, an avocado discolors very quickly. Adding lime or lemon juice helps to prevent discoloration. It is widely believed that an avocado pit left in guacamole will help to maintain the lush green color. Wrong! Stick with the lemon or lime juice.

By the way, avocados are almost always eaten raw. They actually turn bitter when they are cooked. Who knew?

Enjoy!

If you are new to startcooking, or are a regular visitor here, please consider subscribing for free.

How To Make Hot Dogs

posted in Appetizers and Snacks, Lunch by Kathy Maister
Difficulty:
difficulty rating

Hot dogs  cooked in the microwave oven are a quick and easy snack, lunch or dinner.  (Fenway Franks are my favorite but turkey dogs are also pretty great as well!)

Let me begin by stressing that all microwaves have different strengths. They range in power from 500 watts to over 1500 watts. Just inside the frame of your microwave door there should be a label indicating the strength of your microwave.

Knowing the strength of your microwave is very important. Otherwise you may be following cooking directions exactly and still end up with burnt popcorn or an under cooked baked potato! I have an 850 watt microwave oven. All of my directions are based on that wattage.  (Here is a great microwave wattage conversion chart.)

Hot dogs are already cooked when you buy them. All you need to do is heat them up. Place 1 to 4 hot dogs on a paper plate or a microwave-safe dish with a paper towel. (If you are cooking more than 4 hot dogs, do it in stages.)

With the tip of a sharp knife, pierce the hot dog three times; on one end, in the middle, and on the other end. You only need to break the skin. This allows the steam to escape so they don’t explode!

Cover the hot dogs with another paper towel.

Cook on high for 35 seconds. That should be enough to heat them through, but you may have to add another 10-15 seconds.

Remove the hot dogs from the microwave.

Wrap the bun in a paper towel and zap it for about 15 seconds.

You only want to warm the bun. If you over cook the bun in the microwave it will get very hard and chewy as it cools.

I don’t recommend putting the hot dog in the bun and heating everything at once. The steam from hot dog makes the bun very soggy.

For a real treat try toasting the hot dog bun under the broiler. It will make the bun a bit firmer and able to hold all the extras you’re going to pile on!

I like my hot dogs with ketchup, mustard and relish…hold the onions please!

If you are new to startcooking, or are a regular visitor here, please consider subscribing for free.