Scrambled Eggs

posted in Breakfast and Brunch, Eggs, Vegetarian by Kathy Maister
Difficulty:
difficulty rating

If all you’ve got in your refrigerator is eggs, milk and butter, you’ve got yourself a meal.

There isn’t a single time of day that scrambled eggs don’t taste good! Who knows, this simple meal may become one of YOUR signature dishes.

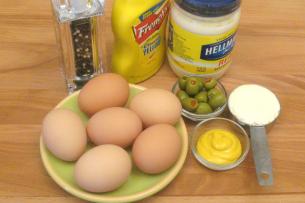
Here is a list of the equipment you will need to make scrambled eggs:

  • A small cup to first crack the eggs into to check for shells
  • A small bowl to put the eggs in for mixing
  • A fork or whisk for mixing
  • A small sauce pan or fry pan, preferably non stick
  • A silicone spatula
  • Measuring spoons

imgp1441_305_01

For 2 servings, or 1 ½ eggs per person the Ingredients are;

  • 3 eggs
  • 2 Tablespoons of milk
  • 2 teaspoons of butter
  • Salt and pepper to your taste

imgp1286_400_01

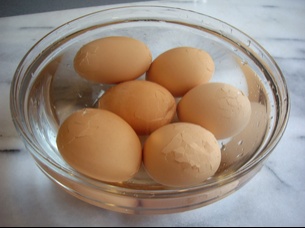
When you buy eggs in the grocery store, check that there are no broken eggs in the carton.

In the United States, by USDA requirement, eggs come already washed so you can use them straight away.

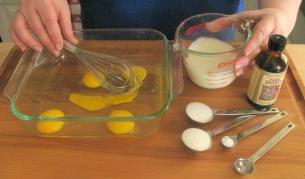
Begin by cracking each egg individually into the small cup. Check the egg to see that it looks okay and that there are no shells. Then add the egg to the mixing bowl.

kmsc.whisk_305

Now add a sprinkle of salt and black pepper (to your taste), and 2 Tablespoons of milk to the eggs. (There is some debate – see comments below – about when to add the salt – before or after cooking.)

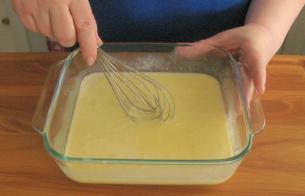
Beat this mixture with a fork, or a whisk, in a vigorous elliptical motion until the yolks and the whites are all a nice bright yellow and completely blended together.

imgp1457_305

(Graydon, in the comments below, likes to skip all these steps and just mix everything up in the pan you are cooking in!)

Put the beaten eggs to one side, and melt 2 teaspoons of butter over medium low heat in a non-stick pan. If you turn the burner up too high the eggs will cook faster, but you will end up with very watery, soggy tasting eggs. So be sure to keep the temperature at medium-low.

kmsc.skillet_305

(Non-stick pans make cleaning up so much easier! However, Non-stick pans can easily be scratched with metal utensils. You’ll need to buy a silicon spatula or scraper. Caution: if you have an old fashioned rubber spatula and not silicone, it will eventually melt when you cook with it.)

When the butter has melted, add the eggs to the pan. As the eggs begin to cook, GENTLY move them around with the spatula so that they cook evenly.

imgp1470_305

GENTLY and slowly stir the eggs.

Continue cooking the eggs until they are thickened but still soft.

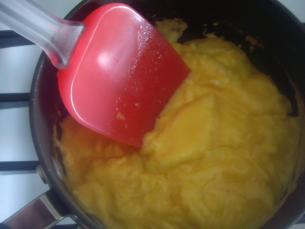
Some people like really soft scrambled eggs, other people like really dry scrambled eggs. Just keep gently stirring the eggs until they look like what you think the perfect consistency is.

Transfer the eggs to the plate and serve them immediately. (As Jon pointed out in the comments, the eggs continue to cook even when removed from the pan and will get rubbery if left in the pan.)

If you wish, you can add some extra ingredients while the eggs are cooking. For example, try tossing in some chopped ham, sprinkling in slowly as you stir the eggs. Or you might try adding some shredded cheese, or chopped green onion or chives. My favorite addition is chopped parsley.

To find out even more about eggs, be sure to check out my post “How to: Eggs“.

***

Five Second Rule lives!

YIKES! When I was taking the photographs for this blog post I dropped my camera into the egg mixture! I scooped it out and wiped it off. The automatic lens sticks a little but my camera still works! Who knew?

(Although some of the photos do look a bit hazy!)

imgp1485_305

Enjoy!

If you are new to startcooking, or are a regular visitor here, please consider subscribing for free.

How To Make Deviled Eggs

posted in Appetizers and Snacks, Breakfast and Brunch, Vegetarian by Kathy Maister
Difficulty:
difficulty rating

When I’m making deviled eggs for a buffet table, I sometimes think perhaps they are a bit old-fashioned and outdated. Then, when the party is over, the deviled egg platter is always empty!

To make deviled eggs, in addition to the eggs, you will need mayonnaise, mustard, salt and pepper, and green olives stuffed with pimentos for flavor as well as garnish.

The first step is to hard-cook (what some people call boil) six eggs.

If you are unsure of how to boil an egg, check out my 30 second video for a quick review!

If you’ve just cooked the eggs, let them cool to room temperature before peeling them. Actually, cold, hard boiled eggs, just out of the refrigerator, are much easier to peel than just cooked eggs. If you are having trouble peeling the eggs, crack the shell at the ends of each egg and put them in a bowl of ice cold water. Let the eggs sit in the cold water about 10 minutes. This allows the water to seep in and make peeling much easier.

http://startcooking.com/public/images/imgp0284_305.jpg

Once all the eggs are peeled, slice them in half lengthwise.

Using a spoon or a fork, gently remove the yolks from the whites and place the all the yolks in a bowl. Set the whites on your serving dish.

I’m using my deviled egg dish which has grooves in it to hold the eggs in place for serving. If you do not have a deviled eggs dish you could put them on a bed of washed parsley so they not only look festive but the parsley will also prevent the eggs from sliding all over the place.

To make the filling, mix together the 6 yolks, add ¼ cup of mayonnaise, 1 ½ Tablespoons of mustard, and a sprinkle of salt and pepper.

(There are many variations to making deviled eggs including skipping the mustard and using horseradish OR curry powder OR even sweet relish.)

With a fork, mix all of this together until it’s smooth. Taste it to make sure it doesn’t need more salt.

Using two small spoons, fill the egg white shells with the yolk mixture. You’ll need one spoon to scoop up some yolk and the other to slide it off the spoon. (Or as Bill suggested in the comments section below, put the mixture into a small Ziploc bag, cut off a corner, and pipe it back into the whites.)

Sliced olives with red pimentos are a traditional garnish for deviled eggs – plus it’s a great flavor combination. A sprinkle of paprika, if you have some in your spice cupboard, is also a lovely garnish on deviled eggs!

Deviled eggs make a great appetizer and a perfect party dish.

Enjoy!

P.S. Once you have mastered making hard boiled eggs you might want to give an egg salad sandwich a try!

http://startcooking.com/public/images/IMG_7882.JPG

If you are new to startcooking, or are a regular visitor here, please consider subscribing for free.

How To Make French Toast

posted in Breakfast and Brunch, Vegetarian by Kathy Maister
Difficulty:
difficulty rating

French toast is one of those “Happy Foods” that bring a smile to everyone’s face. It’s that perfect weekend breakfast food that just makes you feel like you’re celebrating.

You probably have the basic ingredients — eggs, milk, sugar, butter, and bread – sitting in your kitchen right now. Add maple syrup and vanilla extract to your next shopping list and you’ll be ready to make French toast. (All sorts of different flavored extracts can be found near the spices/baking ingredients at the grocery store.)

Plain white bread is traditional, but you can also try using a braided bread (challah), croissants, whole-wheat and rye bread for French toast.

(For a quick review on measuring, check out my video on How to Measure Food)

The following ingredients are needed to make French toast:

2/3 cup of whole milk

4 large eggs

2 Tablespoons of sugar

1 teaspoon of vanilla

¼ teaspoon of salt

Using a shallow bowl whisk them together (or blend together with a fork).

The egg mixture should look like this before you start dunking the bread.

Dunk each slice of bread into the egg mixture just before you add the bread to the fry pan.

Make sure both sides are fully covered.

This step could take a little practice. Leave it too long and the bread disintegrates; not long enough, the bread doesn’t get coated.

Melt 1 1/2 Tablespoons of butter in a fry pan over medium heat. Add however many slices of bread fit in the pan without squishing everything together.

Cook the bread until it is golden brown and then flip it, preferably with a spatula. Let the other side cook until golden brown as well.

Serve it immediately with a dusting of powdered sugar or maple syrup.

Enjoy!

***

P.S. I often get asked questions about the “Shelf Life” of foods. The USDA, a trusted source, offers some guidelines:

This general link to Safe Food Handling Fact Sheet from the USDA will lead you to several charts on food preservation including:

Food Storage

Home Canning

Food Shelf Life

Also,
Food Product Dating
which includes things like

A “Sell-By” date tells the store how long to display the product for sale. You should buy the product before the date expires.

A “Best if Used By (or Before)” date is recommended for best flavor or quality. It is not a purchase or safety date.

A “Use-By” date is the last date recommended for the use of the product while at peak quality. The date has been determined by the manufacturer of the product.

Lastly, when in doubt, throw it out!

Cheers,

Kathy

If you are new to startcooking, or are a regular visitor here, please consider subscribing for free.